"OH-NAH-GO'-SHOG"
SOME MORE KNAPPING HINTS
Copyright ©1997 by W.R. Knapp
Well it's been a year since I first put up these hints and I need to add a few more things. I've learned some stuff that not only helps to reduce breakage, but also helps to gain more control of some of the variables. The more we can control things the better we are at setting up hits and more accurately predicting the results of those hits.
I guess we'll plow right into it!!
Knapping on the leg
Well, you've probably heard of it already, but I've used this method for a while now and I think its great. Its worth looking at why so many knappers are using it. It isn't the only way to knap, but I have found that I have better control and accuracy this way.
You see, quite often with freehand knapping you are holding your preform out in the air with one hand, and your other hand is holding the billet out there. Then you take your swing and you hope that you kept everything in position during that time and didn't flinch, or tilt the stone, or any of the hundreds of other variables that can occur.
Well, when freehanding it, you can cut down on these variables by resting the wrist of the preform holding hand on your leg. Then anchor the billeting arm by resting the elbow against the side of your body. This way you can adjust the "feed" of your preform into the anchored path of the billet swing.
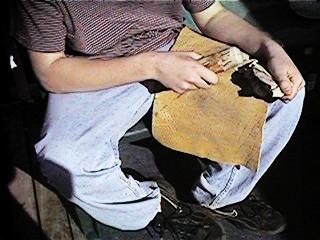
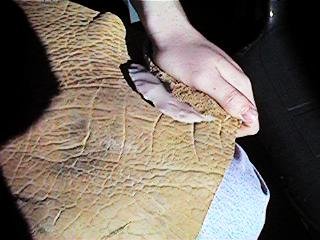
When knapping on your leg as described above, you have a very handy tool for support, and shock dampening. Just fold the edge of the lap pad over the preform as shown and seat it into the resulting pocket with your billet. Now when you smack the platform, not only is everything locked into the proper position, but the stone is supported and dampened, and the hand holding the preform is protected. And you didn't have to pick up another pad or put on a glove to accomplish it!
Now there may still be situations where you would want to use the "pull" the flake technique and you would need to adjust your knapping style to accomplish it. But otherwise you may find this style of support helpful. (You may be able to "pull" the flake by pressing and pulling on the area from the bottom and through the leather.)
Knapping on the leg has been a great help for me. I realize that everyone has their own style. But if you have been having trouble with the accuracy of your strikes, or holding the proper angles, give this a try for several knapping sessions and see if you don't find it a big help. Many of the experienced knappers I have seen use this. And if you hit the platforms right you don't have to worry about hurting your leg because most of the shock is used up with the flake detachment. I don't get any bruises or sore legs.
Good Luck and Have Fun!
April 17, 1998
Why You Should Work The Ends And Then The Middle!
My friend John Geyer told me as a beginner to "always work the ends first, then the middle." Of course I didn't quite catch on right away. Too many things to absorb. And with all the herzian cones and angles and platform isolation there's a lot of abstract visualization going on anyway. Well you don't have to worry...I'll show you right now what he meant.
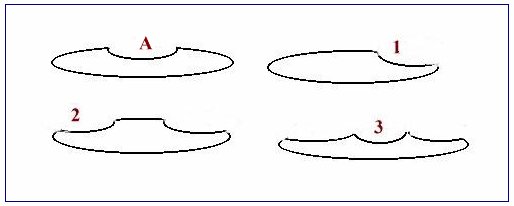
Look at the above illustration. If you were to take a flake out of a preform so that it ended up like figure "A" what do you think would be likely to happen on your next strike? Well, because the preform is so narrow in the center compared to the rest of the preform, it is likely to break in half. Now I drew these examples a little exaggerated for clarification. A real life example could be a lot more subtle. But the result would be the same.
But there is a solution to this trap! Work the ends then the middle. Our first move would be to thin the end like we see in figure 1. Then we would go to the other end and work on that. (fig.2) Finally we would work the middle (fig.3), because now that it has enough bulk to stand up to the strike there's less chance of breakage. And look at the added benefit we achieve. Nice ridges to follow on either side of the middle for our next strikes. When you plan your strikes like this you will notice a more deliberate and "right" look to the scar patterns on your preforms, and they get flat fast!
Now lets use all this on a real life example.
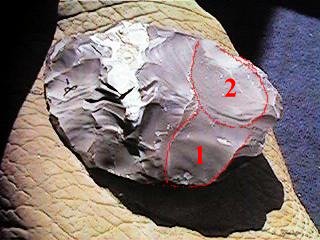
Flakes 1 and 2 are taken from the base end.
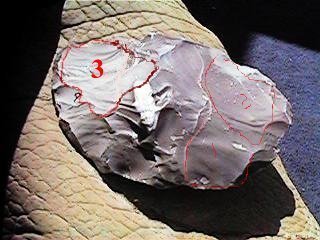
Flake 3 is taken off the tip.
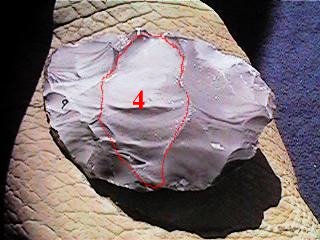
And now flake 4, the middle, is taken off. Because the middle had such a nice ridge, the flake flew clear across the piece--six inches. This preform is six inches wide and seven and a half inches long. but it has already become quite flat on this side with just a few hits because the techniques we have learned here were followed.
So see if it helps you to "work the ends, and then the middle." Good Luck!!
Back to the flintknapping section
This page was last updated on 07 March 2012.
Copyright © 1999 & 2012 by Wyatt R. Knapp
Learn about the atlatl and dart system & the physics behind this powerful weapon
The Mysterious Nazca Lines: How were these huge desert glyphs made? Ancient astronauts?
Victory! Outdoorsmen, primitive skills enthusiasts! Find out more here!
The Firepiston: Ancient Firemaking Machine.
Flintknapping: Observations & hints, hafting glue, etc.
Buckskinning Skills: Making gunflints, ancient Firemaking techniques, etc.
Primitive and Traditional Skills Links.
"The New Atlatl and Dart Workbook" by Wyatt R. Knapp! Click for more information!